Monday 24 December 2018

Teugen Hausen ESR scenario conclusion

Hi again.  This is the final part of our ESR Teugen Hausen refight. Last post we left the French (Friant's division to be precise) in control of the heights opposite Hausen with St Hilaire's division deploying to their rear. At the Austrian end, Lusignan's division was badly mauled and routed entirely with so much accumulated fatigue that it wasn't even worth rallying. So Austrian command resolved to let it go without even attempting some sort of recovery. At this point we carried on........ 


The next two moves are used by both sides to dress their ranks, deploy artillery and generally glare each other down. It is now early afternoon.
 
Saint Julien's division is now deployed but some awful command rolls mean that he is unable to deploy all his artillery at once.
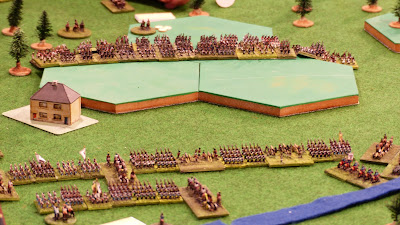
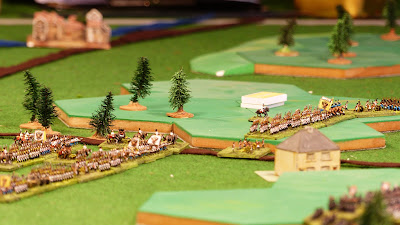
Opposite Saint Julien and occupying the high ground, Friant's troops reorganise their line after kicking Lusignan's troops off the hill.
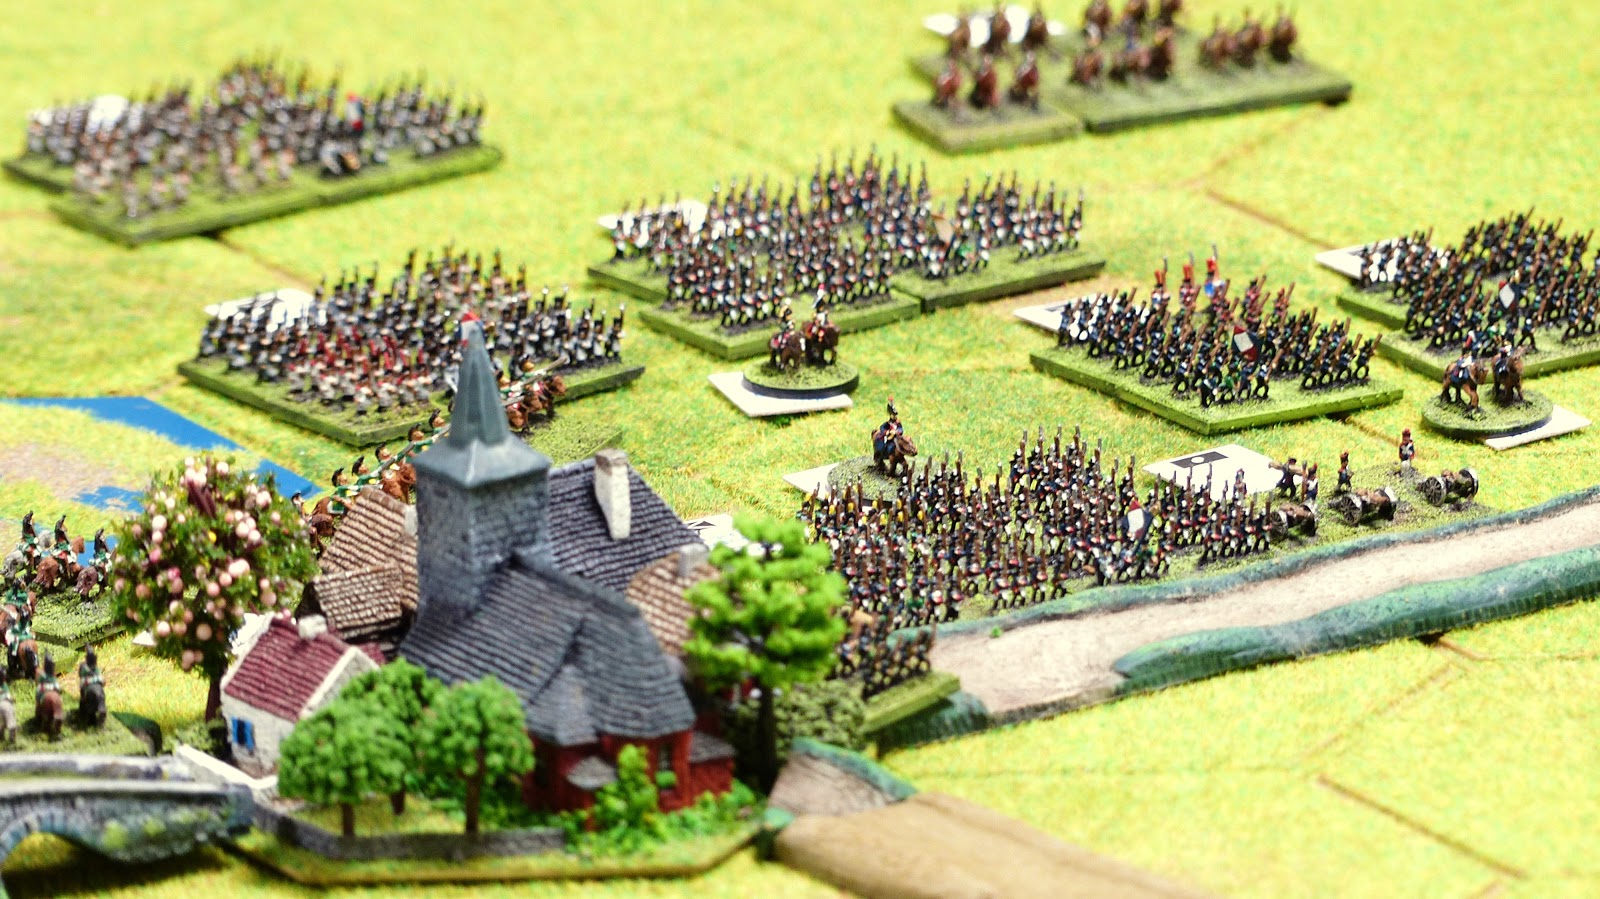
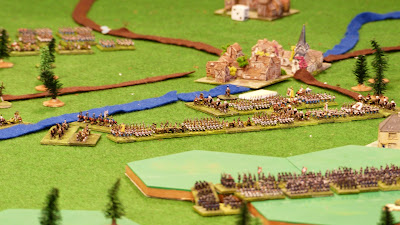
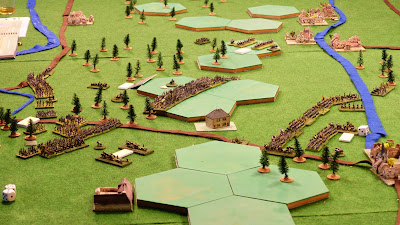
The entire Austrian defensive line. Saint Julien on left, Vukassovich with the Advance Guard on the hill at right
The view from behind French lines
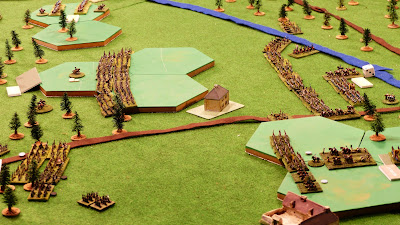
At this point Vukassovich received orders to engage St Hilaire's division opposite him.  Saint Hilaire was still partly deployed with more than half his division still in march column and the Austrian intent was to catch him unawares.  Moreover with the French division partly deployed there was a greater possibility of success for the numerically inferior Austrians.

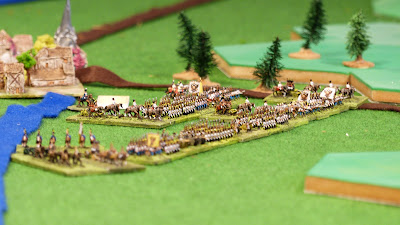
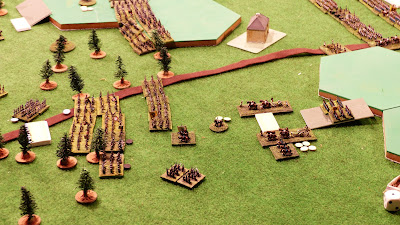
Vukassovich launches his attack (foreground)
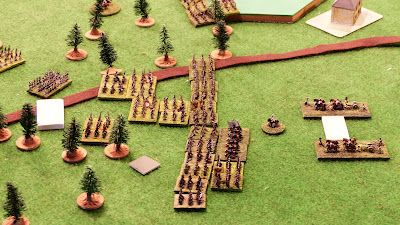
The local situation up close. The presence of cavalry (centre) in the attacking division negates superior French skirmishers and allows the Austrians to advance without fear of the French voltigeurs and tirailleurs
The attacking division (left) from behind Austrian lines
The attack however fails to make any headway and falters
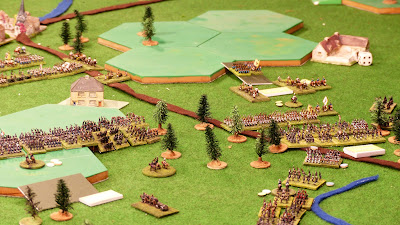
Although a few French units are forced to retire in confusion, all Austrian units are eventually repulsed (right)

On the other side of the table, Rosenborg receives his marching orders to move to the aid of Hohenzollern, His troops move out from around Dunzling.

Rosenborg's column finally lurches forward


Vukassovich fails his Assessment (morale) check and accumulates even more fatigue, forcing him to break contact and retreat (bottom, right). It is now looking decisively grim for the Austrians.

At this point we made some quick calculations.  Rosenborg was at least an hour's march away and needed at least yet another hour to deploy. Furthermore, according to the scenario instructions it would be at least an hour before the Austrian side became eligible to call up two elite grenadier divisions which were held off table in reserve.  Allowing for a quick successful call (improbable) for reinforcements, the grenadiers would need another hour at least to march to the front and deploy. Therefore the French had well in excess of two hours (six moves) before possibly being threatened to the rear by Rosenborg and to the front by any potential reinforcements.  In those two hours Saint Julien's division was practically alone to face the entire French force.

So it became very clear that the French would easily sweep through the weakened Austrians to their front and deal with either Rosenborg or the reinforcements (assuming they arrived) piecemeal.

Clearly the result would be a foregone conclusion so we decided there was no point in continuing. The wide split in the Austrian army and the considerable distance between the two corps proved their downfall and the French would easily brush aside all resistance and march to safety.

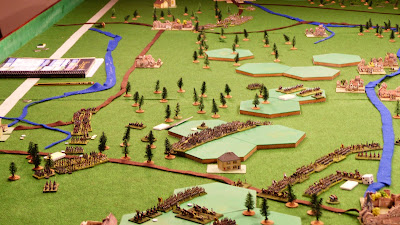
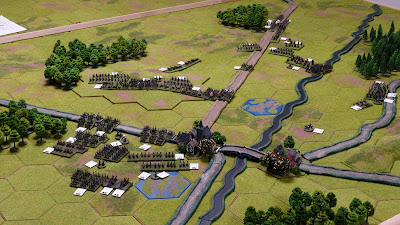
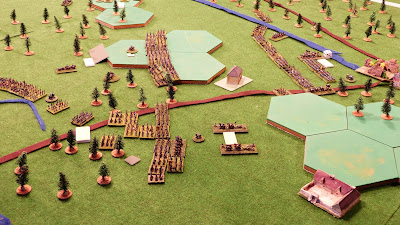
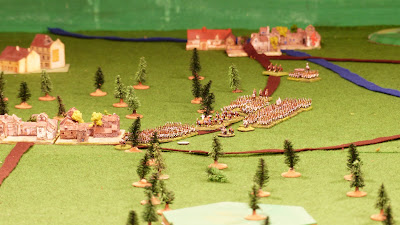
The final positions.  Rosenborg's columns can be seen in the far distance and would need at least another couple of game hours to arrive and deploy. In foreground all that is left to face the French is Vukassovich's very weakened division (bottom left) and Saint Julien (bottom right).  The French have more local numbers and better quality troops so the eventual result was never in doubt.

I am still very much undecided about ESR to be honest.  Ideologically, they are a fine set of rules but I find them to be very economical with the detail and clarifications necessary to play the game without having to interpret many situations.  It is true that there are many examples of play contained in the rulebook but they can hardly cover all situations.  Sometimes a well-placed phrase or sentence goes miles to give a clearer picture of the game mechanics.  I also find that limiting artillery range to 900 yards whereas an infantry unit moves 1125 yards in one move means that most infantry will keep out of range and advance to contact in one move without suffering any bombardment on their approach - once in contact they will take one round of artillery and skirmish fire plus close range fire during the combat phase (canister fire is integrated in an artillery battery's Combat Rating). Having said that however, I still think they are a very good ruleset which could have been excellent had there been a little bit more attention to explain that little bit more clearly.


This will probably be my last post for this first year of my blog.  I must say I am enjoying posting and thank you all for taking the time to visit.  A Merry Christmas to you all and a very Happy New Year, of course.  Happy gaming and hope to see you all visiting once more in 2019!


Sunday 16 December 2018

Teugen-Hausen ESR Scenario - Part 2


We met once more to reprise our refight of Teugen-Hausen using the 'Et Sans Resultat'' Napoleonic ruleset.  In the first part of this narrative we left the French III Corps under Davout marching westwards towards Teugen whilst the Austrian III Korps under Hohenzollern defended the heights around Hausen. Further east, Rosenborg's IV Korps marched north towards Dunzling to engage any French forces there and block any possible outlfanking maneuvre.


Rosenborg quickly arrives at Dunzling to find it bereft of French. His objective reached, he reverts to 'Defend' orders.         
Meanwhile, a few miles west, Friant's division deploys whilst Lusignan's Austrians occupy the heights before Hausen. Lusignan aims to buy time in order to allow the bulk of the Austrian army to deploy to his rear.  

Behind Lusignan's defensive line, St Julien's division deploys at a painfully slow pace. Such is the joy of commanding Austrians !! 
Friant's division (centre, left) is now almost fully deployed while to its rear St Hilaire arrives in support but still in march column. On right, the Austrians opt for a static defence and remain in situ.

While the French take their time to deploy and organise their attack, St Julien's division continues its languid deployment around Hausen.
Charge! Friant's division storms uphill to engage Lusignan's infantry.  Outnumbered 3:1 the outlook looks bleak for the Austrian defenders.
The assault seen from a different angle.
Lusignan is forced to concede the heights to the outnumbering French
Following their mauling at the hands of the French, Lusignan's units fail their Assessment test miserably and accumulate further fatigue, causing them to rout (on left beyond river).

And that's where we left it for the week.  Hopefully we'll wrap it up next session when the two titanic divsions of Friant and Saint Julien will presumably clash. The Austrians are entirely fresh and have a distinct advantage in artillery while the French have racked up some fatigue following their struggle with Lusignan.  However, the French should make up for it with their superior quality and with having the entirely fresh division of St Hilaire to the rear.

To be continued........


Sunday 9 December 2018

28mm Perry Miniatures Dutch Guard Lancers

As I have mentioned in previous posts, I sometimes dabble in the 28mm scale just to enjoy painting the beautifully detailed figures that are available out there. This unit of Perry Dutch Guard Lancers is depicted at Waterloo with their leader - General Colbert - having one arm in a sling.  Colbert was wounded the day before and fought the battle of Waterloo with his wound dressed. The unit is an absolute joy to paint and the detail on the figures is outstanding. I must say they look very nice in my display cabinet!

The Dutch Guard Lancers in all their glory

General Colbert leads his men forward

Close up of Colbert, arm in sling

Sunday 25 November 2018

Teugen-Hausen ESR Scenario

Life has that nasty habit of getting in the way sometimes, and after a few weeks of forced hiatus we sat down around the table once more for some serious gaming. We chose the Teugen Hausen 1809 (or Thann) scenario from the splendidly presented "The First Battle Lost" ESR scenario book. For those not entirely familiar, this was one of the opening engagements of the 1809 campaign where Davout's III Corps was in danger of encirclement.  The French were thus forced to pull off a dramatic breakout with the Austrians desperately trying to prevent this from happening.

As the rest of the gang were not familiar at all with the ruleset, we spent most of the afternoon in explanations and generic chatting on aspects of the rules but this notwithstanding we still managed to put in the first couple of moves.  The mood was positive overall and for gents who are more accustomed to Age of Eagles and General de Brigade, initial impressions seemed upbeat enough. The gradual deployment of a column on the march went down especially well, it being agreed that most rulesets allowing instantaneous deployment of long march columns are not entirely realistic since in real life this would probably not have been so easy. ESR reflects this very elegantly, with the French needing more than an hour in game time to deploy a fifteen-battalion division on the move.  This forces people to think well ahead since nobody wants to be caught napping in march column! I'm attaching a few pics to give an impression of the table and forces involved. There hasn't been any firing or combat as yet but this is sure to be the case next session.  Until then........

The battlefield represents an 8.5 x 3 mile area, which in the 100 yard scale translates into a whopping 12.5 x 4.5 feet table.
In the foreground San Julien's division approaches Hausen in column. Beyond the village, other Austrian units are deployed. The French III Corps can be seen in march column in the distance along the opposite edge of the table.


The bulk of Rosenborg's IV Korps marching through Hellring (top) and Pairing (bottom).


San Julien chooses to bypass Hausen and crosses the Feckingerbach on the way to Teugen.
Seeing Lusignan's division top the high ground to his left, St Hilaire commences to deploy his troops from march column.

Wednesday 24 October 2018

ESR First Playtest

After a couple of weeks of reading and re-reading the 'Et Sans Resultat' ruleset (ESR from now on!), we found the time to set the table up and go for a beginner scenario which is included in the rulebook itself. I took command of an Austrian corps while my pal Dave took charge of a French one.

It took some time to get used to the mechanics to be honest but this is normal, coming from so many years of Age of Eagles. ESR uses a command system which is entirely absent from AoE and this of itself was already a radical shift for us.  Some aspects of the rules are not entirely clear (although it has to be said that one cannot expect all on-table situations to be entirely covered by any set of rules) and we decided to post a couple of queries on the ESR Yahoo Group there and then during the gaming session itself.  Much to our amazement and surprise, the author David M Entseness replied straight away, even though it must have been the crack of dawn in the US, and voila' - our problems were sorted out ! How better can a gamer's life get? Thanks Dave!

Overall the rules play discreetly well and I am sure once they are gotten used to, the QRS should be enough to see players through most situations. We'll go through a few more small actions just to get to grips with the finer detail and then hopefully move on to larger multiplayer encounters.

All in good time........


Wednesday 3 October 2018

Enter 'Et Sans Resultat !'

You just got to love that courier when he delivers the goodies!

Going through recent (and not so recent) reviews on the net, I was intrigued by comments and opinions on the 'Et Sans Resultat!' ruleset (ESR in brief) issued by the Wargaming Company of the US and distributed in Europe by Magister Militum of the UK. Aimed at larger unit formation actions in the vein of 'Age of Eagles', this ruleset seemed right up our street so my pal Dave and myself got us each a copy of the Complete Player's Guide plus an 1809 scenario book to see what we can come up with on table. 

The ESR books have arrived today and my first impression is that they are very professionally presented with loads of illustrations and examples - let's hope they work fine and leave little room for interpretation.  Dying to try them out and hope to give further impressions and maybe an AAR shortly. 

In the meantime would love to hear from anyone who has already given them a shot.

Watch this space !

ESR Complete Player's Guide plus 1809 scenario book

Monday 17 September 2018

Ostrolenka 1807 - A solo effort in 6mm


Having finally set up a decent table in my basement, I decided to try my hand at a solo game.  I used to do a lot of solo gaming in my younger days, mainly because I was under the impression that I was the only nerdy gamer on the island! When I finally discovered the horizon was a bit wider than that, I didn't need to go solo any more.  As anyone who's been to Malta will tell you, distances here are miniscule and although the gaming fraternity is not numerous at all, if you want a game you're only fifteen or twenty minutes away from - not just one - but ALL your opponents. So solo didn't make too much sense any more.  

Now, however, what with all the spanners that life sometimes throws in your works, it's not always possible to meet up. So I thought of setting up a scenario on my table and enjoy a solo game which I could continue at leisure whenever I had some time available. I went for Ostrolenka, an 1807 clash between the French and the Russians a few days after Eylau. The scenario can be found at https://napoleonicscenarios.weebly.com/uploads/2/3/7/7/2377799/ostrolenka_1807.pdf 

It's a relatively small encounter where a Russian force caught a smaller French force unawares at the Polish village of Ostrolenka on the River Narew. The French command, however, soon got wind of the Russian attack and immediately despatched reinforcements to shore up the garrison.  Likewise, the Russians had their own forces converging on the field, giving rise to a short but escalating action. 

All figures are H&R 6mm; rules are Age of Eagles with some house modifications. 

Initial dispositions at 10.30 am, showing the French garrison in and around Ostrolenka with the Russians approaching in the distance.  Note how the town straddles both banks of the River Narew.
Although heavily outnumbered, the French send their light cavalry forward to harass the advancing columns.  On their part, the Russians make for the high ground overlooking the town.
The Russians have reached the foot of the hill and deploy to form a solid front.  Meanwhile to their rear but on the opposite bank, the first French elements approach (upper right)
French dragoons gallop to the rescue !


The first Russian reinforcements arrive on table in Move 3. It is now noon.
Russian dragoons advance on the French lights in a bid to scare them off.
The French light cavalry prudently retire while the Russians occupy the heights in force. On right, the first French cavalry elements approach town. At this point I should mention that the two ponds and the river are frozen over and impassable to cavalry and artillery who can only cross by bridge.
It is soon becoming a race for both sides to rush reinforcements to the front. Oudinot and Suchet's divisions appear behind the town on Move 5 while in the distance more Russian reinforcements pour onto the field. In the centre the lead dragoon elements reach the bridge over the Narew.
The Russian artillery on the hill makes its presence felt as it bombards the approaching French. Meanwhile at upper right, French and Russian artillery trade salvos from across the river while Russian infantry and cavalry reinforcements stream from the rear.
The Russian position on the sand hills overlooking Ostrolenka dishes out a severe artillery bombardment........
......which for the moment the French can only face and absorb defiantly.

It is now 14.30 and despite the intense bombardment, the French have succeeded in getting their cavalry across and put their infantry in a position to assault the Russians on the hill. To the rear, a Russian brigade attempts to cross the Narew to engage the French on the other bank.
As if the artillery wasn't enough of a headache, Oudinot now has to face the threat of Russian hussars too!


Faced with limited options, the French throw caution to the wind and surge up the hill in the face of a muderous hail of canister. The odds are decidedly grim.
A bird's eye view of the french attack and the whole field. Attacking uphill, disordered and having suffered multiple casualties from canister, the French fight the Russians with a -5 deficit......
.....but the dice gods recognise valour when they see it and smile in their favour! (Hint : Green for Russian, blue for French)
Faced with the ferocity of the French infantry, the Russians are forced to withdraw, scrambling to save their precious artillery from the onslaught.
They are quick to react, however, with hussars charging in on the left........
......infantry engaging in the centre.......

.....and heavy dragoons smashing into the French infantry on the right.
The Russians get their own back, routing the first French brigade and rushing headlong into the flank of a second.
In no time at all the hill is bereft of French and all their hard-gotten gains have vanished.
Not one to give up so easily, Savary - the French commander - orders his infantry forward on the left whilst in the centre squares are formed to counter the cavalry threat. Along the bank of the Narew, French cavalry engage the enemy infantry.
French infantry to the assault of the disordered Russian hussars

Massed squares in the centre and cavalry charging in the background.
This second wave of attacks succeed in pushing back both Russian wings. In foreground, French infantry storm back up the hill in a breakthrough charge, having broken the Russian hussars earlier in the move.

Russian infantry at bay
It is now 16.00 and the final move. Having won the initiative, the French press on with their attack and engage the retreating Russian hussars once more.  The Russian cavalry break and retreat again.
Meanwhile, the French dragoons see action at last, outflanking and engaging their Russian counterparts
The defenders are caught in a vice grip, cavalry on one side, infantry on the other. The Russian centre doesn't stand a chance and the entire front line melts away to the rear.
In a final act of desperation, Essen, the Russian commander orders his cossacks forward.  Usually reluctant to engage formed enemy cavalry, the irregulars take up the challenge and hit the dragoons squarely in the flank.
But even the outflanking advantage is not enough and the cossacks are repulsed by the disciplined French cavalry.
The French remain masters of the hill.....
.....while the Russians are forced to retire from the field at day's end.
I feel this is a very difficult scenario for the Russians to win because although they have inital superiority, the French soon build up a formidable force once their reinforcements arrive. It should also be said that the Russians did experience some abysmal dierolls but all in all the balance tips in favour of the French the more time passes. Would love to hear from anyone who managed a Russian victory.........