Given the interest this figure generated I am posting a series of work-in-progress photographs with the hope that fellow modellers will find them useful in developing their painting techniques. I know I posted something similar a few months back but since this knight involved small repetitive patterns which meant a bit more work I thought of putting up another post. Unfortunately I am missing some steps towards the end but I still hope you will get the idea so here goes.
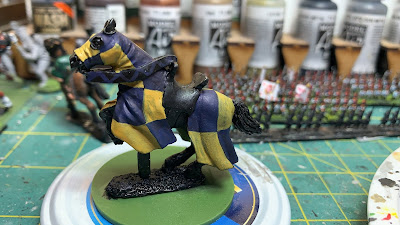 |
| Base coat in dark colours just to get the quarters right |
 |
| A dot pattern is laid down to mark the positions of the Fleurs de Lis |
 |
| Once the positions are final the dots are turned into lines of approximately equal length. Note the different directions to conform with the folding of the bard. |
 |
| The fleurs are put down in base colour and a lighter blue shade is applied taking care not to encroach on the pattern and leave a dark blue outline around each fleur |
 |
| More blue is added and highlights applied to the folds in the blue sections always taking care to work around the fleurs' pattern |
 |
| The final yellow highlight is applied to the fleurs de lis patterns |
 |
| Rough outlines for the dolphins are laid down on the yellow base. Note the final shade of yellow has been applied to the horse's head |
 |
| The final yellow shade is applied and highlighted and the various dolphins are fleshed out and detailed. Knight is still missing some final detailing and carries no shield |
 |
| Done! |

Great step by step mate
ReplyDeleteCheers
Matt
Thanks Matt. Hope you or anyone else will find it useful.
DeleteExcellent tutorial! Now,I see your method. Not that I could duplicate it...
ReplyDeleteThanks Jonathan! Never say never........
DeleteIt’s still amazing when you do the step-by-step thing. Do you always use a brush or is a fine line marker sometimes used?
ReplyDeleteThanks a lot Norm. No markers, only brush. Winton Series 7, 3/0 short for a better control.
DeleteNice tuto and gorgeous job!!
ReplyDeleteThanks Phil. Glad you liked it!
DeleteNice step by step. Do you use a magnifying glass or something similar to see the small details?
ReplyDeleteOh yes! My Donegan Optivisor with its #7 lenses is THE essential piece of my survival kit. Thanks Stew.
DeleteThanks for the info. I might check out getting one myself. Not that I’ll ever paint as well as you though. 😀
DeleteFabulous, fabulous artistry, Mike! Very impressive to see.
ReplyDeleteThank you so much Dean, you are too kind. Hopefully someone will find a useful tip or two......
DeleteFantastic brushwork Mike!
ReplyDeleteThanks a lot Ray! Glad you liked it!
Delete