Friday, 27 December 2019

Peninsular Spanish in 6mm

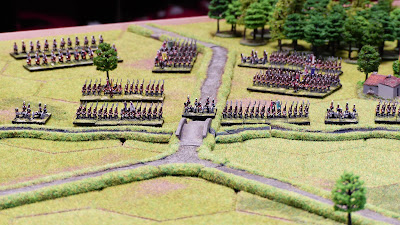
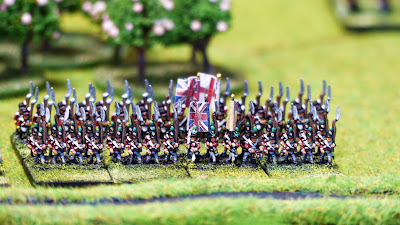
To complement my British Peninsular units I am mustering some Spanish and Portuguese units.  Actually, the word 'some' is a bit of a misnomer since the unpainted lead I got recently from Baccus is anything but ! Anyway, this week I got eight Spanish infantry stands off the painting desk, just shy of a hundred figures, representing the 7th 'Zamora' line regiment with black facings and the 8th 'Soria' regiment with purple facings. I am not aiming for any particular historical scenario so I am choosing units at my whim.  Unfortunately Spanish army organisation was quite chaotic between 1805 and 1812 and OOB's are rarely complete and accurate so it is quite useless to invest too much time in researching in too much detail as very often there is none to be found ! I am mostly using Steven Thomas's excellent site at https://balagan.info which contains a wealth of information on Spanish army uniforms and organisation during the French invasion and the Peninsular War.

As usual, units are based for Age of Eagles on bases 3/4"frontage by 1" depth with twelve figures to a stand.  Baccus come in strips of four so they fit in almost exactly to one base frontage. 
 
There were nominally three battalions per regiment in 1808 but there was no such thing in real life and no more than two would actually see the field.  The first battalion would have two grenadier companies which would sometimes be hived off (as per the Austrian model) into separate units and the rest of the battalion would then join other fusilier units orphaned of their grenadiers into ad hoc formations.  To mirror this as much as I could I put one stand of grenadiers for every three of fusiliers - this should give me the ability to muster the grenadier stands separately if necessary. The figures shown wear the 1802 / 1805 model uniform with bicornes and white jackets in regimental facing colours while drummers wear blue jackets piped in red. Officers carry a crimson sash, presumably to impress the senoritas !

Apart from the regular units there was a plethora of irregular militia and guerilla units, mostly in civilian clothes or brown jackets.  Information on such units is sparse, however, and honestly it is doubtful how useful such units would be on the wargames table so I am not sure if it is worth going into much depth in this area.
Units in line - 'Zamora' to left and 'Soria' to right
Units in Supported Line - 'Soria' in front and 'Zamora' to the rear
 Each regiment carried a king's colour (foreground) together with battalion / regimental flags


Wednesday, 25 December 2019

A short Christmas post

Just a short post to wish you all a merry Christmas and a great new year. I know it’s kind of cliche’ but there you go......

Oh, and happy gaming and painting throughout 2020.

Keep well eveybody and God bless. Thank you all for your readership, comments and support.

Monday, 16 December 2019

Baccus 6mm British Peninsular Army

These past few weeks I have been mustering a 6mm British Peninsular army from Baccus.  Painting sessions have not been too regular but I am finally in a position to field a small army for Age of Eagles (AoE in short). I managed 54 infantry stands, eight artillery batteries, and 16 cavalry stands.  At AoE's scale of 360 infantry and 180 cavalry per stand, this would translate into a small army of 19,440 infantry, 2,880 cavalry, and 48 guns - each battery having 6 guns. In terms of figures, each stand contains 8 infantry figures and 3 cavalry figures, so with the artillery that's in the region of 500 figures, all told.

True to form, Baccus make very detailed napoleonic 6mm figures - it's amazing how they manage to fit in so much detail in such small figures - so hats off to Peter and his team for the quality of their product. It is a shame that they are pretty much larger than Heroics and Ros so they are not really compatible but to be honest this lack of compatibility doesn't show that much once the figures are on table. 

Although AoE is brigade level and doesn't really go into the nitty gritty of lower organisation, I still opted to organise the troops into battalions (two stands = 720 men), with four stands to a regiment at 1,440 men.  I made this choice mainly because of the various facing colours which distinguish the different regiments and their regimental flags. The result was a lovely array of coloured regimental standards accompanied by their respective King's Colours.

I staged a few photographs to give an idea of the finished figures.  There's still quite a pile to finish as well as a lot of Spanish and Portuguese to complement the Brits.  Maybe they will feature in a future post.  For the moment, however, here are the Brits that I've managed up to now, stovepipes and all.


Tuesday, 29 October 2019

Basement Gaming Room complete

I have finally gotten around to finishing my gaming room - it's been more than a year since I posted how my room was progressing and now I can finally say that it is well nigh complete.  That's the way we work things out here in the Med - slow and easy!

Anyway, I put in an 8' x 6' (4.20m x 1.80m) table which should be enough for most games in my preferred 6mm scale, even though there will always be the occasional scenario which requires even more space.  In such case I have enough space in the room to extend the table but for the moment an 8' x 6' will do.  I have the table covered in Kallistra hex terrain and am particularly pleased how their half hexes cover all around the edges to give the table a neat, complete look.

I fitted a few frames, two of which are really 1,500 piece jigsaw puzzles glued onto backing board and then framed.  Ages ago I got a Confederate Stars 'n Bars from a local camping shop (God knows what it has to do with camping!) which I pulled out of storage, had it washed by my better half and put on display at one end of the table. I also put in some old hifi equipment that I had lying around - a radio, amplifier and analogue turntable - after suitably having the lot reconditioned and cleaned. I don't mind having music going on at (very) low volume in the background. At the further end of the room I set up a bench to do my occasional airbrushing work.  It also doubles up as a workbench with some storage underneath. In future I hope to utilise the space beneath the table itself for even more storage as I don't feel I have enough at the moment. Before next summer I plan to put in an A/C unit or it would become unbearable down in the basement during the summer months. 

All that's left now is to start pushing tin and roll them dice......

The completed room with workbench at the far end. The two large frames at centre are jigsaw puzzles.  My 6mm collection is in the two cabinets on right. Still a lot of space to fill up in there !
From another angle showing hifi cabinet used for storage and display of some old diecast models.

Friday, 20 September 2019

My take on painting medieval heraldry

I was truly pleasantly surprised to receive so many positive comments on my last blog post for which I thank you all once again.  Most of your comments were appreciative of the heraldic designs on my models and this set me thinking about posting a blow-by-blow painting sequence in the hope that it might come in somehow useful to fellow modellers / gamers. I hasten to add that this is the method I have adopted and prefer but others might have their own different methods and I am by no means suggesting that this is better than any other method used.So here's my tuppence on this subject.

All colours quoted are Vallejo acrylics.

First of all, I identify a heraldic design to be painted.  Google usually comes in very handy here and for this particular case I chose one of the various rampant eagle designs available online. Having visualized the final colour scheme of a white eagle on a blue background in my head, I set off to clean the figure and apply black undercoat. The finished figure will be in Ultramarine so I applied a base of Dark Prussian Blue. The eagle will be painted directly on to this base so for starters a stick figure is sketched in German Camouflage Beige (Stone Grey works just as well) just to get the proportions and dimensions right.  Unfortunately I neglected to take a picture of this step but I made a mental note to take one when painting the shield so that I can convey the idea.

First brushstrokes - the rough stick figure gives an indication of position and proportion 
Once I'm happy with the positions and proportions I proceed to make my first full rough sketch, again in German Camouflage Beige which will end up looking something like this:

The stick figures have been fleshed for the first full sketch

The just-started figure against the specimen eagle design

Now is the time to start detailing. Rough edges are evened out using the backing Dark Prussian Blue as well as touching up with the German Camouflage Beige.  This is maybe the most tedious part of the process because it involves a lot of to-ing and fro-ing between the two colours, but it is also the most important since it will have a determining effect on the final result. Once I'm happy I paint the beige over using Sky Grey but being careful not to occult the underlying beige colour completely especially where the wings connect to the outlying feathers or where the legs join the body and tail. I tend to dilute the colour so that some beige will show through as I find this gives depth to the final design.


Sky Grey coat over beige base with some beige showing through

The final layer in white is now applied, again taking care not to paint too much over the grey. The narrow 'secondary' feathers extending outwards from the wings are left in grey so as not to give them prominence over the thicker 'main' feathers. Only slight highlighting touches in white are applied in the tail design and claws - leaving gaps showing the darker base colours to give depth and pop things out. This method is also applied to the wing feathers - applying the white only to the outer edges highlights the curvature in the wing shape.

The rampant eagles are now ready, having been highlighted in white. A border in Burnt Red has been added to the bottom border of the bard.
Once the eagles are complete the first layer of Ultramarine is laid on. Here I take care to get as close as possible but not into contact with the eagle design, leaving a razor thin outline of Dark Prussian Blue barely visible around the eagle.  This is extremely important since the dark outline is what makes it pop. Care has to especially be taken around the feathers, claws, and elaborate tail design. The first coat of Ultramarine will look something like this:


Once this stage is complete things become much easier as now it is only a matter of finishing off the Ultramarine bard with darker shades and highlights taking care not to encroach on the eagle design. 

The mount as advanced work in progress

The same principles are applied to the jupon and shield. The former is quite tight in space but this can be turned to advantage since you can do away with a lot of detail and giving a rough overall idea is usually enough.  The shield is much larger and visible so all the detail will need to be applied.

The final touch to the eagle design is a Light Orange beak as well as Vermillion tongue and talons. Finally the model is varnished in Satin Finish. And this is the completed figure:


Finally I think it's only fair to say that I am fully dependent on my trusty Optivisor for all my painting and use a variety of brush sizes but mostly 3/0, 2/0, and 1. I really hope someone might find this useful and really look forward to any comments, tips and suggestions you might have.


Tuesday, 27 August 2019

28mm Mounted Men at Arms for Lion Rampant

I have always had a soft spot for colourful mounted medieval knights and this is my first such unit for Lion Rampant.  All figures are 28mm Front Rank and all liveries/heraldry are fictitious. As always, Front Rank figures are a pleasure to work on.  All colours are Vallejo acrylic Model Colour with the exception of the metallics which are Vallejo Air.  I find the Vallejo Air Steel especially effective when highlighting armour over successive layers of Metallic Black and Gun Metal.


Monday, 22 July 2019

Tamiya 1/35th Sdkfz 222

Having languished over twenty years in a storage box I finally fished out an old Sdkfz 222 kit from Tamiya in 1/35th scale. Although I wouldn't call myself a WW2 buff, I grew up in a world of Commando war comics, Airfix model catalogues and similar literature, and the 222 was always one of my favourite armoured cars. So when, one fine day, I came across a Tamiya version and I snapped it up but as most time happens, I just chucked it in a storage box with a view to assembling it 'someday'.

Well, that 'someday' finally arrived. I somehow got inspired to build this kit (also thanks to a truly excellent "PLASMO - Plastic Models" video on YouTube) and after rummaging around a while, I managed to locate the long-buried box.  I opted for the desert version - that was always my favourite theatre (together with the Pacific but there weren't any 222's there, were there?) and although the end result is nowhere near competition level, I am still reasonably happy with the finished model. Being an older version of the model, this kit had no photo-etched parts and the anti-grenade mesh is made of flexible plastic which although still effective, is not as crisp as the more recent photo etched brass. Decals had to be repurchased on ebay since the original ones were uselessly fragmented with time and the model was airbrushed in flat sand with a satin finish.  I used Tamiya brown panel liner extensively but didn't feel confident enough to go for any weathering so the final look is a sort of 'factory finish' effect. Unfortunately the decals left flash marks on the satin finish - I suspect if I had first sprayed on gloss varnish I would have avoided this but it is from such mistakes that we learn.

Anyway, here is the end result:


The merciless Mediterranean summer has taken its toll on our wargaming activities lately and it's been some time since we met for some gaming at the clubhouse.  With temperatures hovering around an average of 35 degrees Centigrade (that's 95 deg F for our friends in the US), and at one point even touching a whopping 41 deg C, it is hardly tempting to leave the comfort of one's home and face a blazing afternoon trip to the club.  Admittedly we've got aircon on the premises but it doesn't really compensate for the sagging energy levels caused by the high summer humidity which greatly amplifies the effects of the high temperatures. We can only batten down the hatches and sit it out for now. Iced beer anyone?

Thursday, 27 June 2019

Modelling interlude - Space Shuttle Discovery in 1:72

 I haven't posted anything these last few weeks because I was busy hacking away at a Revell 1:72 scale model kit of the space shuttle Discovery. Now I am by no means an accomplished modeller - I used to build the odd kit now and then in my younger days but I haven't touched a single model kit in years. Lately, however, I started to get the itch again and started off with a 1:35 scale Tamiya German Sdkfz222 which is not yet finished - I'll have a post on that when it is. Following that I went for the Shuttle.

Now you might think that a 1:72 scale model of the shuttle is a lofty goal for a quasi-rookie and you would be perfectly right.  In fact, the first thing I immediately realised was that I was way out of my depth here.  However, after a zillion youtube visits, I began to understand the ways of the 21st century modeller and by hook or by crook somehow managed to finish the model complete with a small with diorama base. At this point I should acknowledge DaveG’s input and handy advice whenever I was faced with some sort of dilemma during the build. But there's a story behind this model and the real reason for attempting such a large one is - I am ashamed to say - a direct result of my dereliction of duty. So I'll take the walk of shame in atonement...….

Thirty or so years ago (yes, that's right - three zero, thirty), my brother in law knocked on my door with an extra large box in his arms.  Seeing I was into modelling and he had no inkling of the hobby at all, would I be kind enough to put together his new space shuttle model kit? Not being one to refuse a challenge (and you can't really upset your newly wed wife's brother now can you?) I said sure and was left with this overgrown baby sitting on my lap. I got around building most of the model and then passed it on to Dave who was an already an experienced airbrush user (whereas I didn't even have one at the time) but for a million reasons, not one drop of paint landed on the model and as a result it was gone and forgotten in the labyrinth of his industrial garage. The poor thing lay there, lost and forgotten until a casual remark a couple of months ago reminded me that one space shuttle delivery was way, way overdue.

So I set around trying to pick up where the project had been left off but alas! the model was discovered under a pile of stuff with a three inch hole in one of the wings. I never knew asteroids could do such damage! So that set me off on ebay trying to find one of these models which by now have become almost vintage.  Anyway, I managed to find one from the US for 65 bucks but by the time I had factored in the shipping costs and VAT, I ended up forking out way more than a hundred euros. Such is the price of complacency I suppose!

The large box arrived quickly enough and the build itself was enjoyable, enabling me to gain loads of experience. At slightly more than 19 inches in length, the Shuttle was a bit challenging sometimes but I somehow managed. Airbrushing was especially harrowing since there was so much masking to be done with those black and white sharp boundaries but worst of all were the decals.  The model is from the nineties so with age the decals were simply disintegrating and it is truly miraculous that I managed to pull them off (although close inspection reveals some of the defects which were impossible to hide).

Anyway, the build is now finished and I hope to deliver sometime in the next few days. I'm not sure what the reaction will be but, hey, space trips can be quite long can't they?

Upper view. I am particularly pleased with the way the tarmac park turned out
Cargo bay open to reveal ESA spacelab and other scientific equipment
Nose, cockpit, and entry hatch detail

The cockpit roof can be removed to reveal the interior
Ma'am, there's a Shuttle in your back yard


Cargo bay detail


Rear rocket cluster detail

Now that this one's ready I've moved on to my next space build - an Airfix 1:72 scale Apollo Lunar Module.  Given that it's the 50th anniversary of the first moon landing next month I thought it would be the most appropriate model to build right now. But more of that in a future post...….


Sunday, 26 May 2019

Down memory lane

Day after day in the hot Mediterranean summer, I would sit on my mum's doorstep waiting for the postie. Anticipation would well up at the first glimpse of him at the bottom of the street and would rise to a crescendo the closer he got only to have it crash down catastrophically once he breezed past me without even a nod of acknowledgement to my presence. Deflated and dejected, I would walk back inside and resign myself to another twenty four hour wait.  This daily routine carried on for days on end until one day the man actually stopped at our doorstep and handed me the much anticipated folded piece of paper.  I had received a package and it was waiting for me at the post office! Needless to say I was down at the town square within minutes, the three-hundred-metre-or-so run dismissed effortlessly with the energy of youth. Once at the counter I was handed over the small thin package and in the blink of an eye I was back home, hands trembling and fumbling away at the cardboard outer.  My first wargaming book had arrived! 

In those days Airfix and Humbrol were all the rage - Airfix kits, Airfix Magazine, Humbrol enamels and what-not. They were the undisputed industry leaders, at least in this corner of the world. In 1974 someone at Airfix Magazine came up with the idea to start publishing dedicated modelling and wargaming guides and a series of 28 books were eventually published by Patrick Stephens Ltd between 1974 and 1978. All books were numbered in sequence but being just a kid with some pocket money I couldn't afford more than one book. My choice fell on Guide number 4 - Napoleonic Wargaming by Bruce Quarry, a small 64-page book with all you needed to get started in wargaming - with a full set of gaming rules included! This was the book I was so eagerly awaiting every day that summer of '74 and it was the book that set me off in this wonderful hobby of ours.  That book still sits proudly on my bookshelf after all these years and although I have moved on in the hobby, it is still the book I treasure most.

My wargaming genesis - the book that started it all
Of the 28 books, I eventually collected the four that dealt with wargaming but then I moved on to other rulesets and eventually lost interest in the series. Recently, however, I asked myself why on earth I hadn't collected them all and after a flurry of ebay activity, I am now the proud owner of the entire collection.  Granted, now that the modelling world has changed so much these last forty years, most of their content is obsolete but nostalgia overcomes everything and all twenty eight books now occupy a good chunk of my bookshelf, faded spines and all.

The four wargaming books in the series

The entire collection


Saturday, 11 May 2019

Mediterranean buildings in 6mm


The postie handed over some goodies this morning - 6mm Spanish / Italian buildings from Total Battle Miniatures’ excellent Big Battalions range. Queen of the lot is a marvellous monastery which - however - is a bit overscale and I suspect will look too imposing on the table. Still, it’s a magnificent model which is worth adding to any collection. The models are very finely sculpted and I particularly like the terraced rows of houses inspired by the medieval Tuscan town of San Gimignano, one of the most picturesque places I have ever been to. One of the houses has a stone fountain attached to its facade and it is small details like this which make all the difference in my eyes. Hope to paint these soon and upload pictures of the finished product shortly.

Typical medieval terraced houses
The whole lot. The monastery is the monster on the right
Monastery front and chapel annex
A peek into the courtyard

Baccus British light dragoons deployed for scale