Showing posts with label WW2. Show all posts

Friday, 14 January 2022

Pzkpfw III Ausf L in 1:72 scale

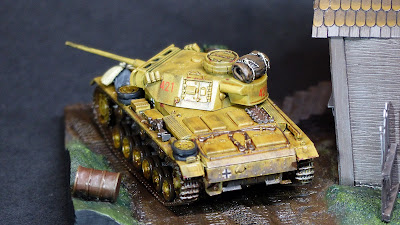
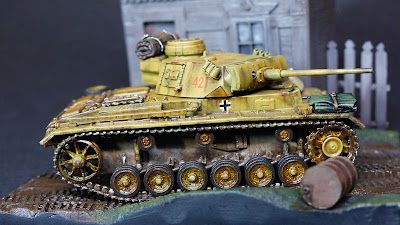
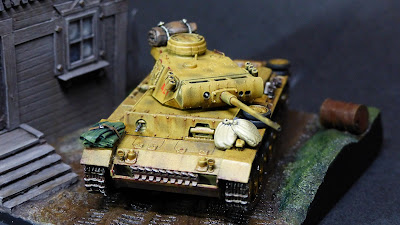
Been a while since I last posted anything because I was working on two projects simultaneously. One of them is now ready and is a Panzer III Ausf L from Dragon in 1:72 scale on a resin diorama base from Black Dog. According to Dragon's leaflet, it bears the colours and markings of Panzer Regiment 33, 9th Panzer Division, South Russia in Spring of 1942.

Since the base is moulded with deep-set AFV track markings I thought to give a fresh mud look - the kind after all the thick Russian winter snow has melted away and leaves a quagmire behind. So I dished out a generous splashing of AK Fresh Mud weathering on the underside, wheels, lower hull, and the road base itself. Ak's product remains glossy to give that wet, muddy impression so I tried to avoid hitting the muddy areas with the final matt coating as much as possible to retain their wetter look. The kit itself was built straight from the box and I only modified the turret handes by replacing them with 0.3mm wire. The extra tarpaulins, sandbags, oil drum and spare tracks are from Black Dog and I feel they give a bit more 'oomph' to the end result. The resin base is an excellent rendition of a Russian hovel. I wanted to give a plain, weary look with wooden planks weathered by the elements.

I enjoyed making this one and hope you will enjoy the pics as well. Until next time!


Forgot to paint the tail light!

Turned around to view starboard side


Tuesday, 14 September 2021

Panzer 38(t) Ausf G in 1:35 scale

Even though this is supposed to be a wargaming blog, I'm really into these larger scale tank models now. I have to admit it is a very nice facet of our wonderful hobby which until now I had only touched upon occasionally. My latest model is a 1:35 scale Panzer 38(t) Ausf G from Hobby Boss. These early tanks proved to be very resilient and even though production was discontinued around 1942 (they had become hopelessly obsolete by then), they continued serving practically until the end. The 38(t) hailed originally from Czechoslovakia - the "(t)" in its designation stands for tschechisch which is german for czech according to wiki - and even though it stopped being used as a front line tank mid way during the war, it's hull and chassis formed the basis of the Marder, Hetzer and Jagdpanzer 38. It's four large road wheels are unmistakable! 
 
This kit from Hobby Boss is extremely well produced. Parts fit perfectly, are extremely well moulded and highly detailed. It's a pity that the only interior detail is in the turret and the interior of the hull is completely devoid of detail. I even had to scratch build a partition in case light from one end of the hull would be somehow visible at the other. Seems to me a bit nonsensical to put detail in the turret but not in the hull as going for an open turret hatch would surely reveal the empty hull interior below. The version I opted for is a 1944 Bulgarian army vehicle painted entirely in dark yellow as was also customary for the Wehrmacht in the later war years. It seems the Bulgarians had only ten 38(t)'s delivered during the war. I was not aware the Bulgarians used a black cross insignia on their tanks, very similar if not identical to the markings the fascists used in the Spanish Civil War in pre-WW2 years. So you see, you also get to learn stuff apart from enjoying the build!
 
The extensive riveting on the wheels, hull and turret made for a lot of painstaking washing and highlighting (each rivet was individually washed with oils and highlighted in a buff colour) but it is such an outstanding feature on the model that it seemed a shame not to invest some more time on it. In the end I was quite pleased with the way that turned out.  Weathering and general polluting was with the usual AK pigments and washes.


Wednesday, 11 August 2021

Panzer 1 Ausf A in 1:35 scale finito!

 It's been some time since I last posted - a mixture of other priorities, working at my desk, carrying out loads of home maintenance and sheer downright disinterested laziness. Maltese summers are punishing - this one particularly so - and drains most of one's energies except to go to the beach or drink ice cold beer when it gets a bit cooler in the evening. The Euro Cup and Olympics didn't help either!

But enough excuses. The reason I am writing again is that finally - and I stress the word finally - I have managed to finish my Hobby Boss 1:35 scale Panzer 1 Ausf A.  It's been four months in the making (shame on me!) but here it is at last.

I opted for the German Grey version - the 'Negrillo'

The hatches were left open so that at least some of the interior remained visible

The driver's hatch allows a decent interior view

I tried to give a heavily used look to the tank

Starboard wheel assembly showing accumulated dust and grime

Port view. All dust weathering was done with AK pigments

The hull was weathered with a combination of oil washes and AK pigments

Tamiya panel liner and ink washes brought out the open hatch details

Top down view showing commander's position

View through the driver's hatch

I must say it was a shame to lose a lot of the interior detail but unfortunately that's how it is with AFV's. The engine cover although not cemented is firmly kept in place by the exhaust pipes and rear viewing port and if removed it can easily scratch or break some parts. So again, all the engine detail is lost from viewing -  thank goodness I took loads of pics before sealing it in!  Still haven't decided if I should put the model on a base. Probably I will but I just want to get it out of my hair now and start something else straight away while the mojo's back.

Hope it won't be another five months to the next post!!!

Wednesday, 24 March 2021

Panzer 1 Ausf A in 1:35 scale wip

If I really had to exert myself to find some sort of positive side to the pandemic it would be that the longer indoor hours are ideal for larger scale modelling or gaming projects. For the last few weeks I have been busy at my latest build - a 1:35 scale Pzkpfw 1 from Hobby Boss. Now this model is a bit different from most since it has a full interior build - hull, turret, and engine - so really it's two builds in one, internal and external. 
The kit - it is such an early model of the Pz1 that there is also a SCW variant

The interior is highly detailed but from my research I soon realised that I would have to make some additions. All external viewports needed to have latches, hinges, and rivets added and furthermore all electrical wiring in the crew and engine compartments was missing.  But the main headache was the interior colour. I have come across a lot of confusing references - some entirely in Ivory (the Germans used a colour called Elfenbein), some entirely in a dark hull red colour, some claiming a mixture of both with the lower hull in red while the upper hull and turret in ivory. Others mentioned a light blue differential while others still added a dark green differential since the Germans were cleverly passing their early tanks on as agricultural tractors to circumvent the Versailles treaty conditions!  Actually all these colour schemes were in force at some time or another but it is not always clear at which point they were employed between 1935 and 1945. I decided to do a Spanish Civil War vehicle and my final choice fell on an entirely Elfenbein interior but to be honest I am still not sure if I made the correct decision.
 
As for the build itself this is a really excellent kit and very few parts proved problematic to fit. When it came to finishing the interior I imagine any vehicle in which a crew is spending long hours would end up pretty messed up after a few days on campaign. So I tried to give a very dirty appearance to the interior with all types of oil, fuel, mud, and assorted grime on the lower hull flooring.  I hope I haven't overdone it but I doubt anyone would wipe their boots clean before entering a tank! The driver's feet position I messed up particularly badly seeing that it would have been constantly trodden upon and I also added rust, paint chipping and grime to both the floor and side wall. I reasoned the worst of the wear would be in the lower hull, getting less and less grimy further up in the upper hull and turret. 

Lower hull with transmission in centre foreground and driver's position on right

The Pz1's Krupp M305 engine is beautifully rendered
 
Lower hull driver's position


Lower hull interior. The port latches, hinges, and rivets are all built from scratch


Turret interior with suspended commander's chair. Again, all port structures are from scratch
 
The two MG13 7.92mm machine guns are highly detailed

Next to the ammo rounds in the upper hull I noticed what seems to be a toolbox which I couldn't possibly leave empty. So I quickly ordered a toolset in 1:35 scale from Mathomodels and filled the box with tools. I think it came out very nicely.
 
Mathomodels photo etched tool set. Cool!

The tools snug inside their box next to the ammo rounds

With the interior practically done it's now time for the exterior
 
I still have to do some pipework around the radiator in the engine compartment and a few touching up here and there but I consider the interior mostly done. I will now move on to the tank's exterior and hopefully upload the next post with the finished model. There are two Spanish Civil War colour versions and still haven't decided if it will be the full dark grey 'Negrillo' or the later three colour camouflage pattern in sand, green, and brown.  Jury's still out on this one!
 
Until next time, keep well. 


Sunday, 14 February 2021

Dragon Stug III Ausf B in 1:72 scale

This week's AFV is a 1941 Stug III Ausf B serving on the Eastern Front in 1:72 scale from Dragon.  The Stug III is my second favourite German AFV after the Panzer IV and I was looking forward greatly to this build. However, I must say that this Dragon model was a bit of a disappointment following last week's Sdkfz 231 build.  My biggest gripe was with the tracks and wheels.  These came into one single rubberised piece and was not convenient at all to fit onto the hull. Even worse, the tracks have no holes on the individual chain links and have whopping mould marks on the front and rear which cannot be removed. The model only consists of a single sprue and is made up only of a handful of parts - very few in fact.

            Only a handful of parts on a single sprue. Note the solid track assemblies in black at bottom

 The only way to solve the wheel and track issues was to resort to heavy weathering and try to 'suffocate' the lack of detail under the mud and grime. So I opted for a wintry look where some vehicles were rapidly whitewashed in a thin coat of white paint over the standard dark panzer grey. This frequently resulted with the grey showing through the thin coat of white. Furthermore as the crew would need to walk on the vehicle itself to enter and exit, most of the white paint would be rubbed off on the top surfaces with all the frequent comings and goings.

To simulate the weathered paint with the underlying panzer grey showing I decided to try out the 'hairspray method'. This consists of giving the model a coat of hairspray over the basic panzer grey colour and decals applied. Once the hairspray dries, a very light coat of white is airbrushed onto the model, decals and all. Once dry, a wet brush with shortened bristles (to stiffen them a bit) is used to reproduce scratches and worn out paint.  Hairspray is very sensitive to water and soon melted away together with the white paint, exposing the panzer grey underneath.  I had never tried this before but thank heavens for Youtube!  

Finally I applied heavy weathering and mud to the underside and lower hull to simulate the messy terrain these tanks must have operated in during the Russian winter.  Helped cover most of the defects I mentioned before too.

I must also include a word of thanks to Steve Jones Scale Modelling Site on Youtube which has an excellent series on building this particular model. It is a brilliant and helpful channel which served as a big inspiration and reference source.


 Now I am working on a much larger model, a 1:35 scale Panzer I Ausf A from Hobby Boss. This will take much longer to complete so it will be some time before my next post. However, I might put down a wip post at some point.

Stay safe and carry on hobbying!


Monday, 8 February 2021

Dragon Sdkfz231 in 1:72 scale

 As anticipated in my last post I am presenting a model of an Sdkfz 231 (8 rad) in 1:72 scale from Dragon Models. This is my second AFV in a row after the captured KV2 I posted a few days ago. I have to say this is a very nice model, with a great fit and quite amazing detail for a small 1:72 scale vehicle. It is in Sicily 1943 camo of wavy dark green lines over the classic German dark yellow.  I have to admit that the green lines should be much thinner than they came out but I am not yet too familiar with the more intricate airbrush techniques and my airbrush is a basic model so I doubt it is able to produce pencil thin lines anyway.

The model was weathered using a mixture of acrylic, oils, and AK weathering pigments. The commander is from the 20mm German Tank Crews set of Preiser's Military range. These are very well moulded multipose figures in soft plastic and with 20 figures to a pack they give a very nice range of poses and options to choose from.

The kit requires only minor modifications such as drilling holes in the exhaust pipes but I think it is well nigh impossible to get all 8 wheels to touch the ground simultaneously.  In fact in all the internet material I came across for this model there were always a wheel or two suspended by a fraction of a millimeter in mid air. This, however, should not be an issue if the model is mounted on a diorama base. Dragon give the option of choosing whatever number plates you want but the miniscule decals for this make it a challenging - albeit not impossible - task. I chose to compose my late dad's old Ford Anglia number just for laughs !


Top-down view.  The green lines should be thinner and more numerous

The cable attached to the front is moulded - one of the few things I didn't like

Loads of underside detail - shame it's all hidden from view!

Next up is a 1:72 scale Stug III in Russian front colours from Dragon Models